help center
The ServicePortal allows child care programs and teachers access to all of thread’s services in one place. It is also the hub for services provided by the Alaska SEED Registry. Find how-to documentation and answers to your ServicePortal questions here.
Browse Tutorials By Topic

What can child care professionals do in the ServicePortal?
- Join or renew your membership in the Alaska SEED Registry.
- View the Alaska SEED Career Ladder.
- Register yourself or multiple staff for thread training.
- Cancel a training registration.
- Print training transcripts.
- Update your contact information and opt-in to emails or text reminders.
Still need help?
Check out our FAQs for answers to frequently asked questions.
If you cannot find the support you’re looking for, please contact us:
800.278.3723
info@threadalaska.org

Getting Started
Video: How to Log Into the Portal for the First Time

Creating Your Account
If you have had an active Alaska SEED Registry membership in the past four years, you will receive an email from thread or threadsalesforce@threadalaska.org. The email will include a welcome message with a link to follow to get started. Your username will be included in this email and is usually your personal email with .thread added to the end of it.
If you have not had an active Alaska SEED Registry membership, the first step in accessing the ServicePortal is creating your free account by clicking “Not a member?” under the login button on the login page.
To create your username, simply add .thread to the end of your email address. For example, if your email address is example@email.com, your username will be example@email.com.thread. This addition will help you establish a unique and easily identifiable username for your account.
Create Your Username:
Add “.thread” to the end of
your preferred personal email address.
example@email.com
example@email.com.thread
Fill out all the fields on the form. Read and check the box agreeing with the Terms & Conditions and then click Register. You will then be successfully logged in and redirected to your home page.
Navigating the ServicePortal
Video: How to Upload Documents
Video: How to Manage your thread Trainings
Video: How to Give Admin Access
Video: How to View Training and Education History
Video: How to Submit a Technical Assistance Request
Video: How to Apply for Trainer Approval
Video: How to Apply for Reimbursements
Video: How to Apply for an Alaska Credential
How to Register for thread Training
Video: How to Register for thread Training
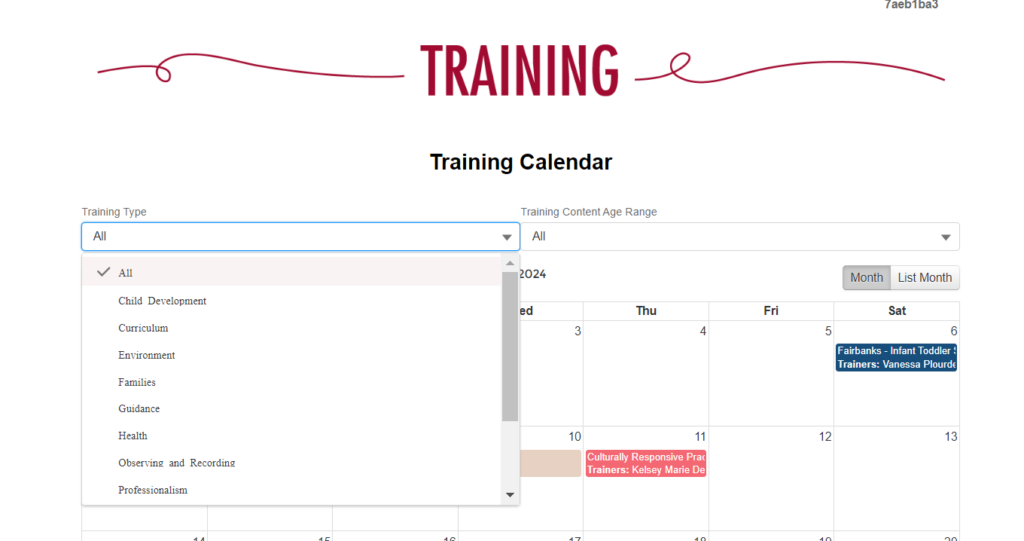
View the Training Calendar
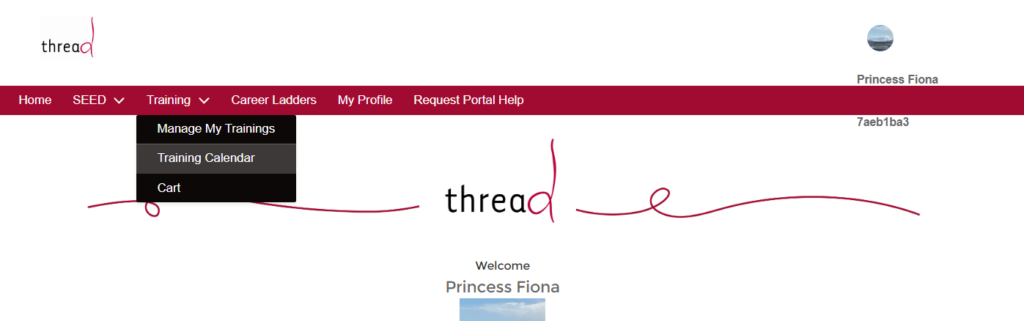
Click on “Training” in the red navigation menu across the top of the screen. Then click on “Training Calendar” from the drop down menu.
You can switch which month the calendar is showing by clicking on the left or right arrows at the top left of the calendar.
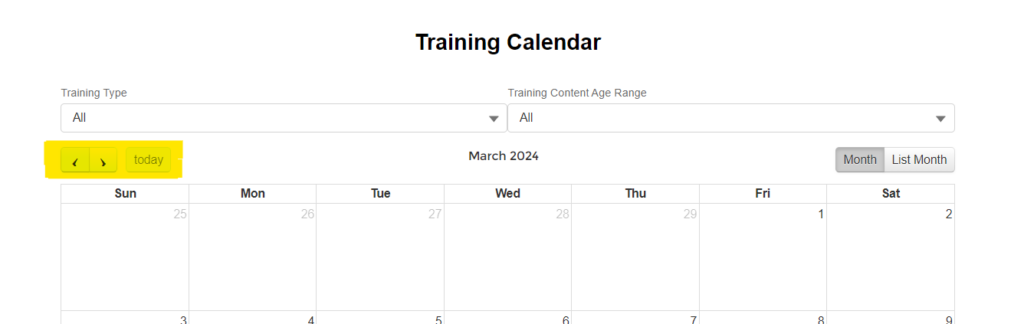
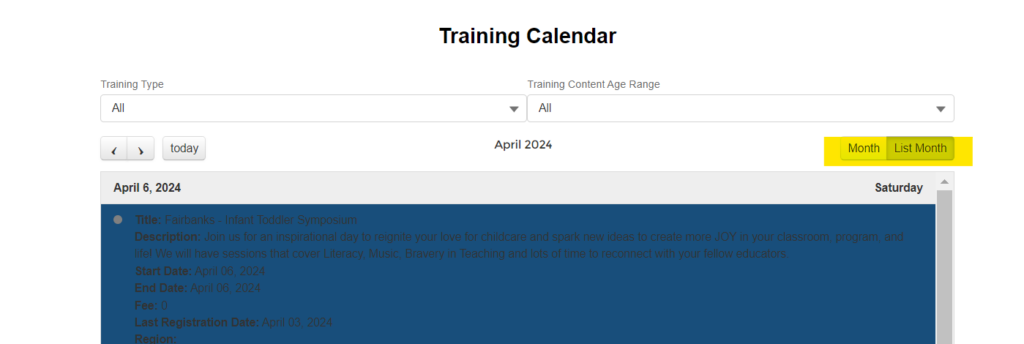
You can also switch to a list view by clicking on “List Month” at the top right of the calendar.
You can filter the calendar by Training Type or Training Content Age Range using the two filters above the calendar. If you cannot find a specific training, make sure these filters are both set to “All.”
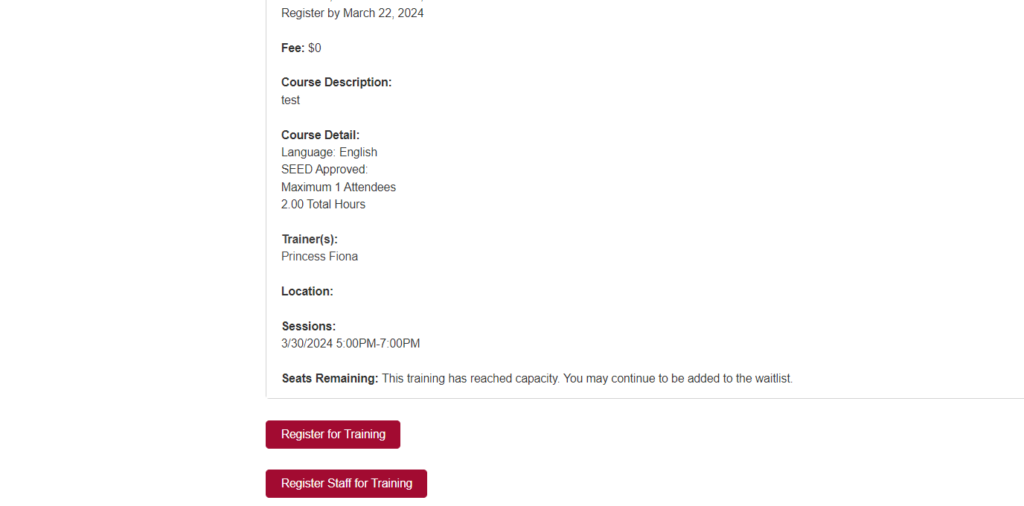
Once you find the training you would like to attend, click on the training title. Review the information provided on the Training Registration detail page. Review Dates, Fees (if applicable), the Course Description, and Course Detail. Make note of the location of the training and if it is virtual or in person. The dates and time of the training can be found under “Sessions” near the bottom of the screen.
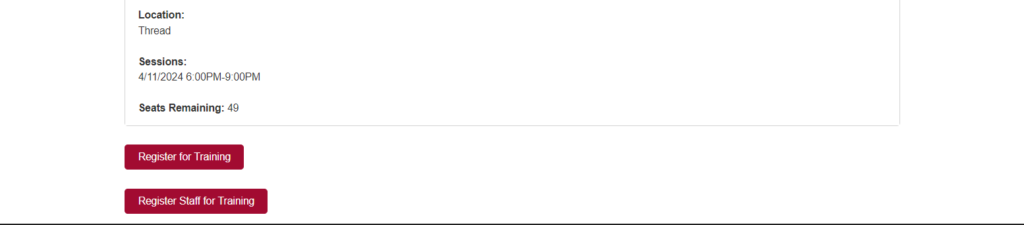
The “Seats Remaining” field will show how many spots are still available for the training. If no spots are available, you can be waitlisted. You can review how to be waitlisted and what to expect when waitlisted under “Waitlisted Trainings” further below.
Registering Yourself
Once you are through reviewing the training information, click “Register for Training” at the bottom of the screen. There will be a “Success! Your training has been added to your cart.” message. Please make sure to click “Checkout” at the bottom right of this screen in order to successfully register for the training.
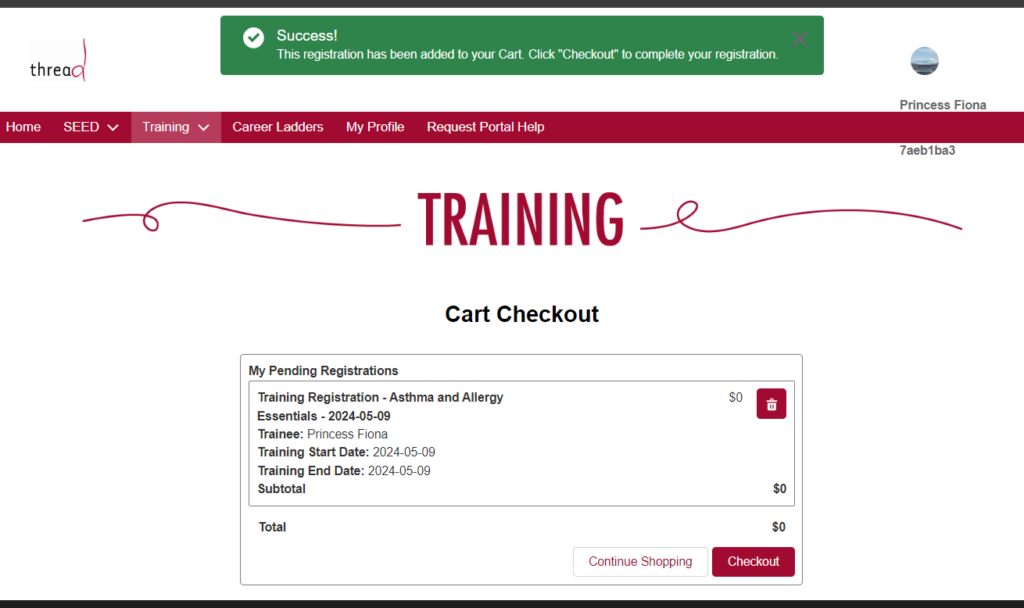
You will receive a brief “Success! Payment Accepted!” message, even when trainings are free. This signifies you are successfully registered for the training.

If you do not click “Checkout,” the training will stay in your cart until midnight that night. At midnight, the training will be removed from your cart and the registration record deleted. You will then need to complete the full registration process again in order to attend the training.
If a training is in your cart and you decide you do not want to register for it, you can click on the trash can in order to remove the training and delete the registration record. Click “Continue Shopping” to return to the training Calendar.
Registering Your Staff
In order to have administrator access to manage training registration for your staff (who have given consent), please reach out to thread at 907.265.3100 to set you up as an administrator for your program. Your staff will then need to log in to their own ServicePortal account and ensure the “Register me for thread training” consent field is checked on the appropriate employment affiliation.
Access the Training Calendar by clicking on “Training” in the red navigation menu across the top of the screen. Then click “Training Calendar” from the drop down menu. Once you find the training you would like to register your staff for, click on the training title.
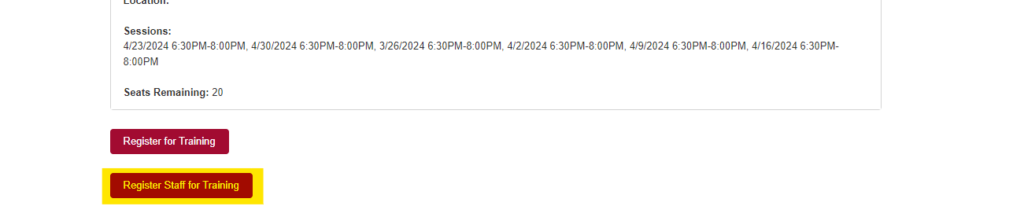
Scroll down to the bottom of the Training Registration details page and click “Register Staff for Training.”
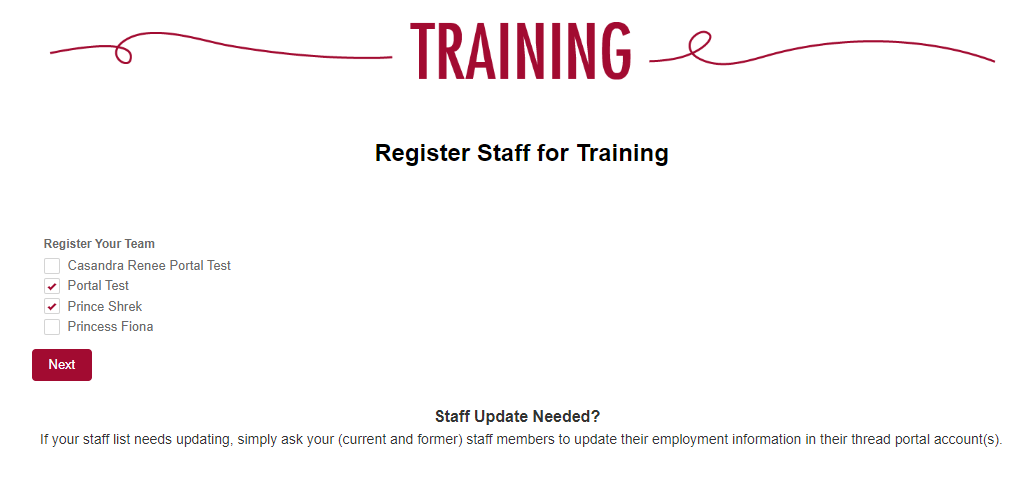
The next screen will show you a list of staff available to register for the selected training. If your staff list needs updating, simply ask your (current and former) staff members to update their employment information in their ServicePortal account(s). Select the staff members you would like to register and then click “Next.”
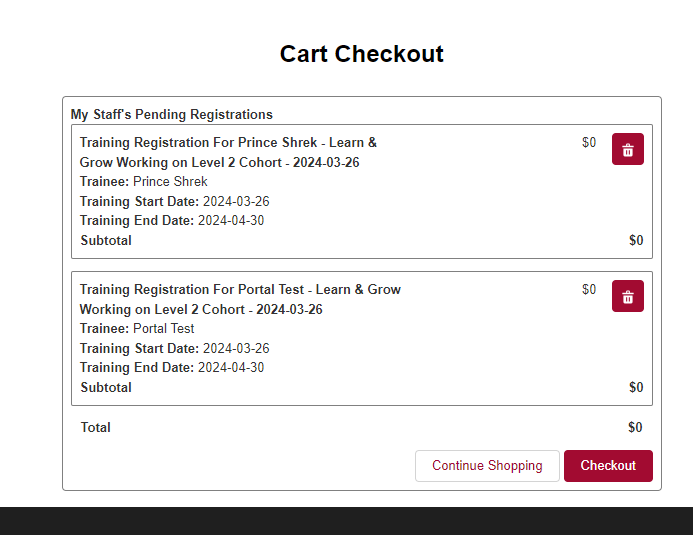
Each staff member you registered will show up as a separate item in your cart. Review the items listed and then click “Checkout” at the bottom right to successfully register your staff members for the selected training. A brief “Success!” message will appear and then you will be redirected back to the training calendar.
Emails Pertaining to Training
Training Confirmation Email
After clicking “Checkout,” and successfully registering for a training, you will receive a confirmation email with training details. You will receive a second email a few days before the training with more details. If you have questions or concerns, please email thread at training@threadalaska.org.
Trainee Reminder Email with Location and Zoom Link (if applicable)
Four days before the training start date, you will receive a reminder email with training details and any Zoom links (if the training is virtual and Zoom links are needed). If you have questions or concerns, please email thread at training@threadalaska.org.
Training Evaluation Email
After taking a training, you will receive an email with a link to an evaluation for the training. Please take a few minutes to complete this training evaluation. If you do not receive this email, please email thread at training@threadalaska.org.
Training Certificate
Certificates will be emailed within 30 business days of completing a training. If you have questions or concerns, please email thread at training@threadalaska.org.
Waitlisted Trainings
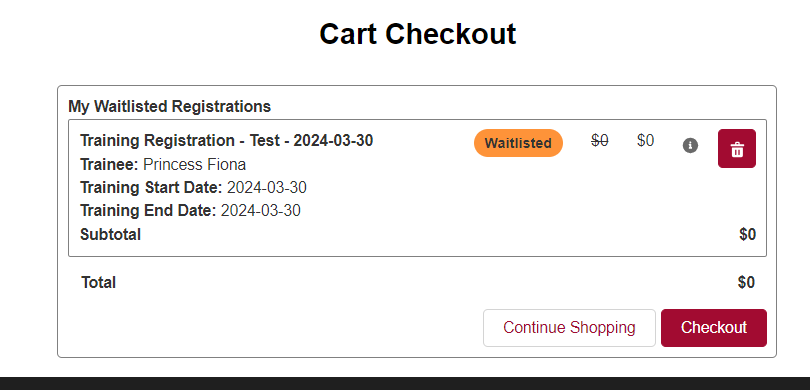
If a training is already at capacity, the “Seats Remaining” field on the Training Registration detail page will read “This training has reached capacity. You may continue to be added to the waitlist.” You will click “Register for Training” at the bottom of the screen.
You will get a “Success” message and the training will show up in your cart with an orange “Waitlisted” tag. You will need to click “Checkout” in order to successfully be waitlisted for this training. You will receive an email stating you have been waitlisted for the training and will be emailed if a spot opens up.
Cancel A Training
For Yourself
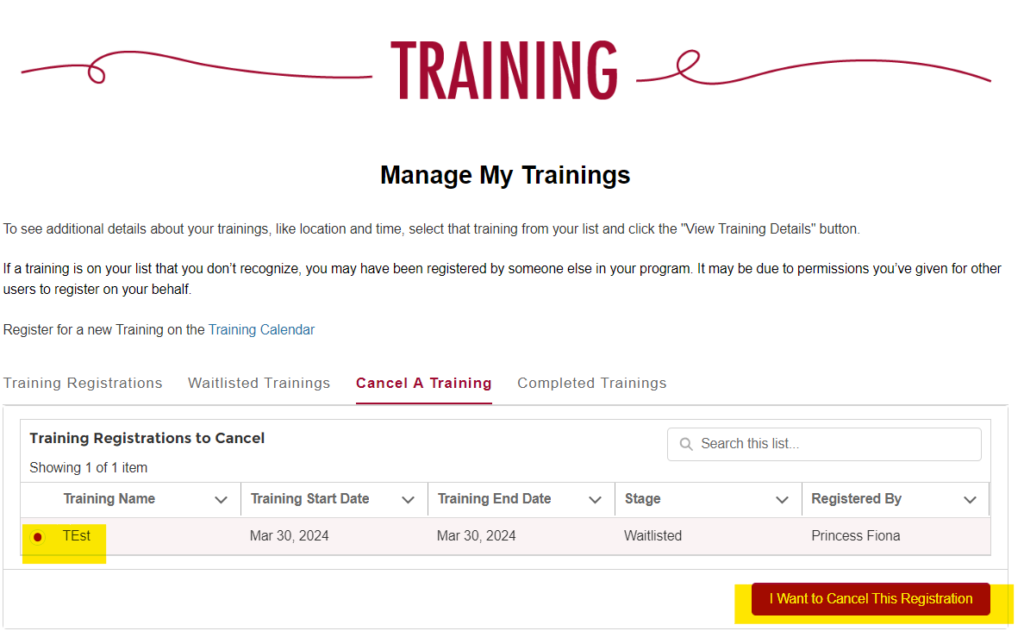
Click on “Training” in the red navigation menu across the top of the screen. Then click on “Manage My Trainings” from the drop down menu. Here you will see a list of trainings your are registered for.
Click on the “Cancel A Training” tab. Select the circle to the left of the training you would like to cancel. Then click “I Want to Cancel This Registration.”
The next screen will show you details for the training you would like to cancel. Make sure to scroll down to and click “Yes, Cancel Registration” in order to successfully cancel your training registration.

The next screen will have a “Success! Your training registration for ”Test Training Title“ has been cancelled.” You can click “Done” to clear this message.

For Your Staff Members
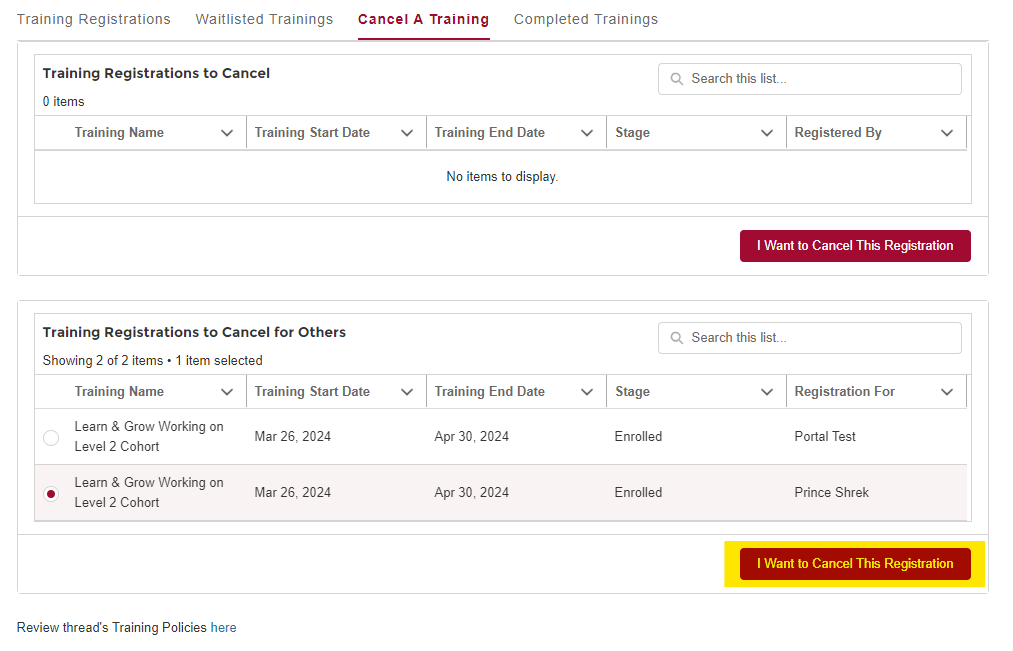
Click on “Training” in the red navigation menu across the top of the screen. Then click on “Manage My Trainings” from the drop down menu. You can scroll down below the “My Training Registrations” box to find “Training Registrations for Others.” Here you can see the trainings you have registered your staff for.
Click on the “Cancel A Training” tab. Scroll down and click the circle to the left of the staff members training you would like to cancel. Please note you can only cancel one person’s training at a time. Click “I Want to Cancel This Registration.”
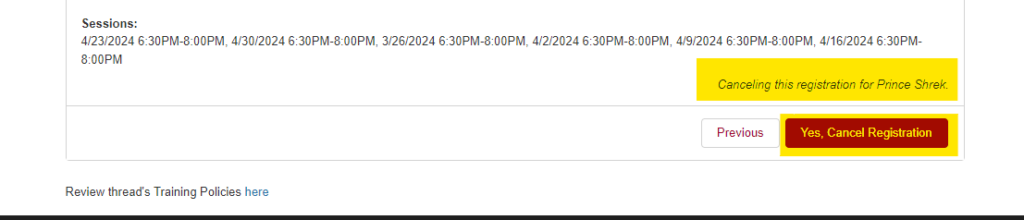
A screen will appear with the Training Registration details. Scroll down to where it says “Yes, Cancel Registration.” You will see a note right above this button saying “Canceling this registration for ….” signifying one last time the staff member you are canceling this registration for. Click “Yes, Cancel Registration” in order to successfully cancel the training registration for the selected staff member. A success message will appear and you will click “Done” to move forward. Repeat this process for each staff member you would like to cancel a training registration for.
Printing Your Training Transcript
Click on “Training” in the red navigation menu across the top of the screen. Then click on “Manage My Trainings” from the drop down menu. Here you will see a list of trainings your are registered for. Click on “Completed Trainings.” Your completed trainings that will be included in your transcript will appear here.
Please note: documentation of past trainings you’ve taken with thread prior to the ServicePortal launch in May 2024 is still available but not yet visible. Internally, thread staff have access to your training documentation, but there is no connection yet for this to be visible externally. We are developing a “comprehensive transcript” which will include all training documents submitted. There is no release date set yet for this feature.

Click on “Print Transcripts” at the bottom left. A PDF transcript will generate. You will be able to download or print the transcript from your browser.
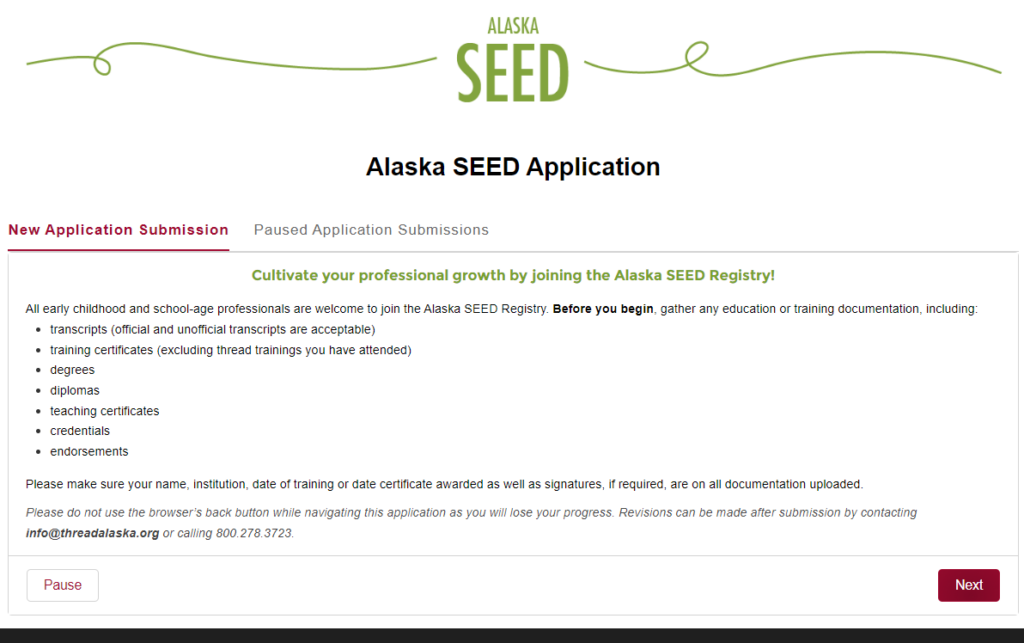
How to Submit an Alaska SEED Registry Application
Pausing and Resuming Your Application: If at any time you need to leave your application for more than a few minutes, click Pause located at the bottom left of the screen. Type in the Pause Reason and then click Ok at the bottom right of the pop up screen. You can, at any time, log back in and click on SEED in the red navigation menu across the top of your screen and then click Alaska SEED Registry Application. Click on Paused Application Submissions. Click Resume on the application you would like to continue filling out. The remainder of your application may appear in a different type of screen flow. This is ok and will still submit fully to the SEED Registry application team.
Video: How to Submit an Alaska SEED Registry Application
Getting Started
Click on “SEED” in the red navigation menu across the top of the screen and then click “Alaska SEED Registry Application.” Please read the informational text on the screen and then click “Next” at the bottom right.
Contact/Demographic Information
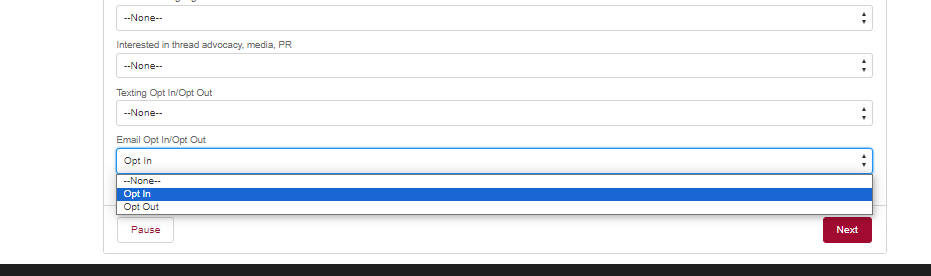
On the next screen, you will need to fill out your Name, Date of Birth, and contact information and then click Next again. *Please note that if you opt out of emails on this screen, you may not receive certain emails such as training reminders, SEED certificates, or SEED Registry renewal reminders.
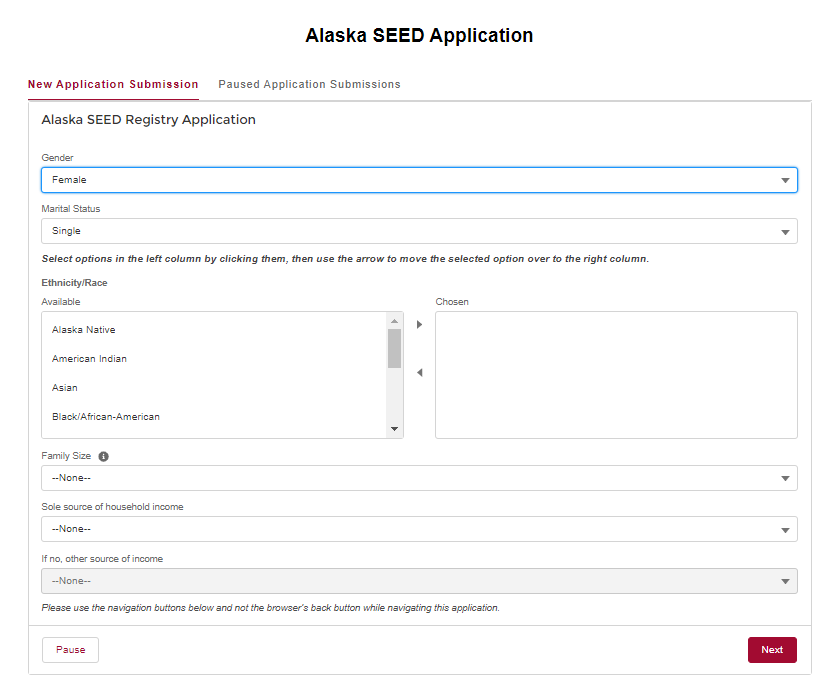
On the next screen, you will fill out your demographic information and then click “Next.”
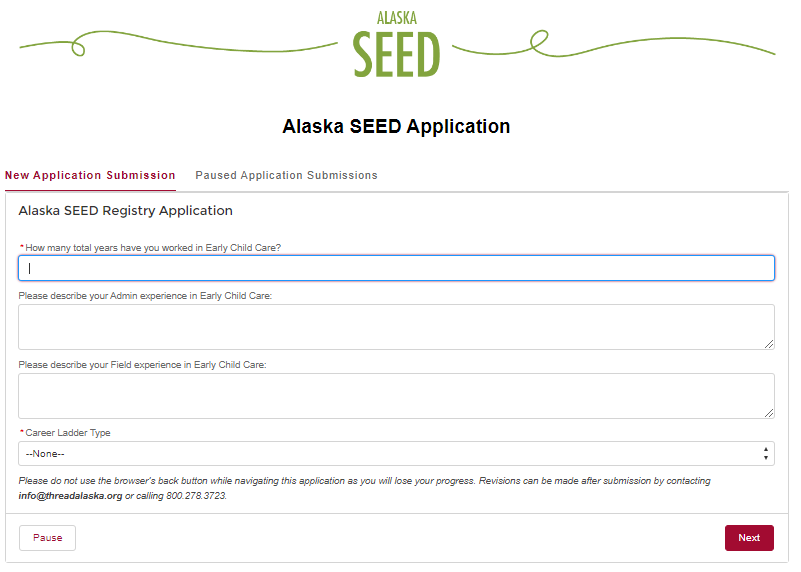
Career Ladder Type and Field Experience
Choose Your Career Ladder
On the next screen, you will fill out your experience in the early child care field and whether you are applying for the Early Childhood/School Age or Infant Learning Program Career Ladder. You can find a description of both ladders here.
Place of Employment
The next screen will verify your primary place of employment. If the information is correct, select “Yes.” Options will appear allowing you to give consent for your program owner/administrator to register you for trainings and/or view your Alaska SEED level and status. Once you have made your selections, you will click “Next” at the bottom right.
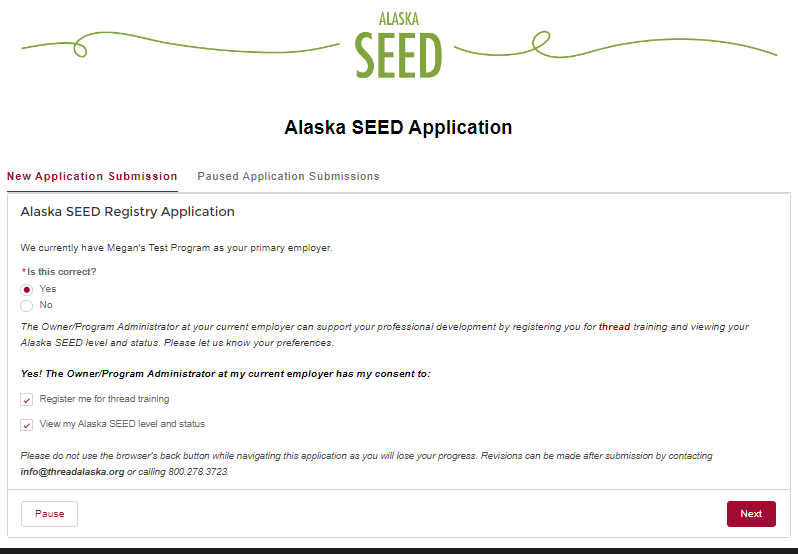
If your primary place of employment is incorrect, please select “No” and then “Next” at the bottom right.

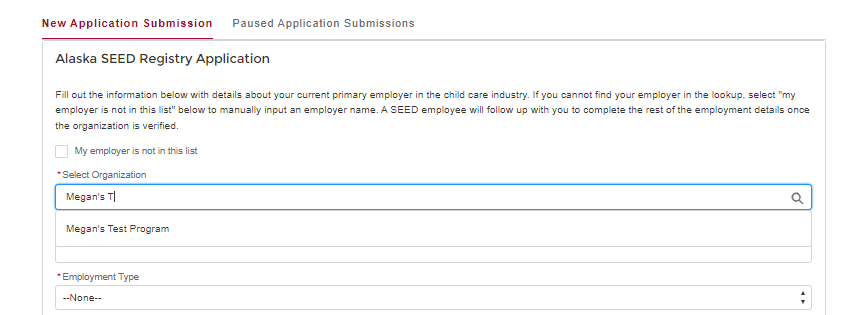
On this next screen, in the Select Organization field, begin typing in the name of the program or organization you work for and then click on the appropriate organization/program name that appears to populate the field.
Fill out all of the required fields. Make sure to review your selections for allowing your program administrator to register you for training or view your Alaska SEED level and status. Click “Next.”
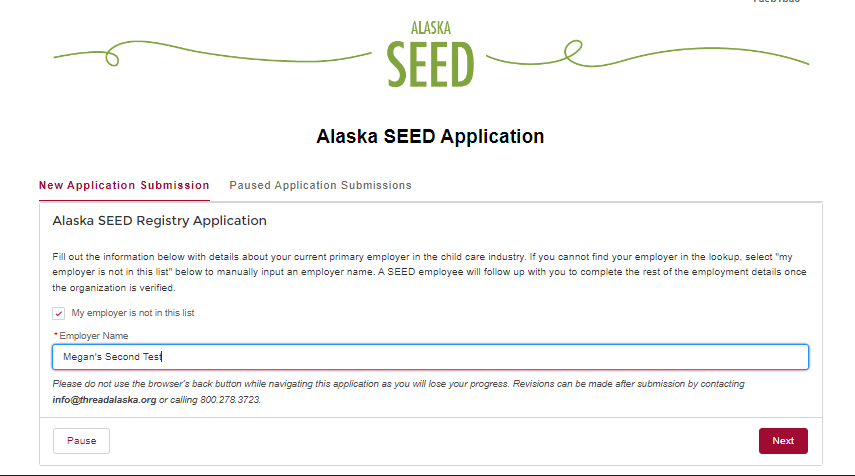
If your employer does not appear in the list, please check the box “My employer is not in this list.” An open text field will appear and allow you to type in your employer’s name and then click “Next” to proceed to the next step.
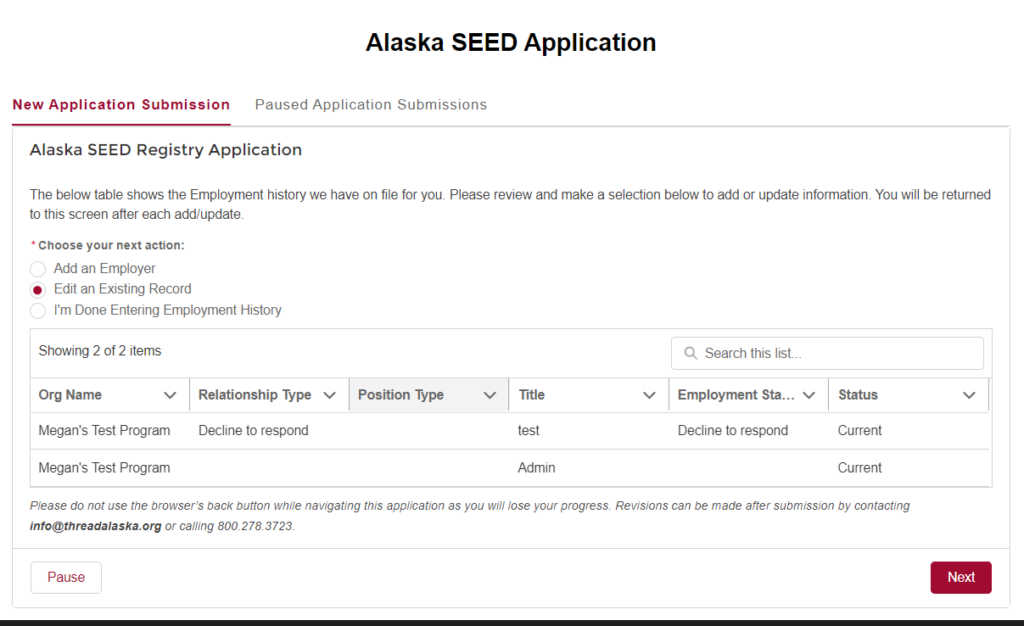
Review Your Job History
The next screen allows you to review your job history in the early child care field. If you do not see a child care program or organization that you work/worked for in the list on this screen, you can click “Add an Employer,” and then the “Next” button located at the bottom right.
Here, you will begin typing in the name of the program or organization you work for in the “Select Organization” field, and then click on the appropriate organization/program name that appears in order to populate the field.
If your employer does not appear in the list, please check the box “My employer is not in this list.” An open text field will appear and allow you to type in your employer’s name and then click “Next” to proceed to the next step.
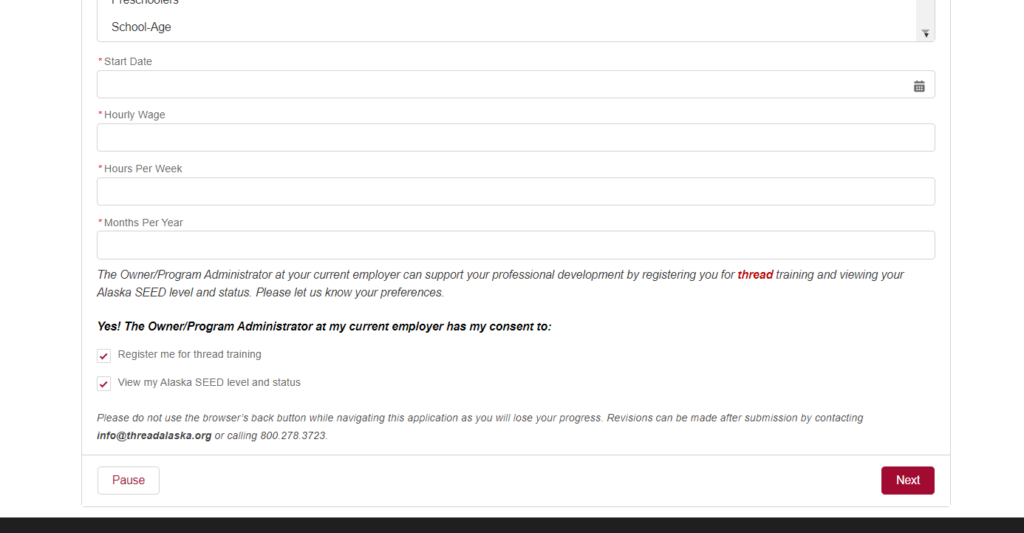
You will also need to fill out your title or role at your place of employment, your employment type (contractor, owner, employee, volunteer), your employment status (full time, part time, seasonal, or ad hoc), whether this place of employment is your current place of employment or former, your start date at this place of employment (and end date if it is a former place of employment), your hourly wage (if salary, estimate what your hourly wage would be), your hours worked per week, months worked per year, age groups worked with (to select multiple age groups, hold down the shift or ctrl key while clicking). Make sure to review your selections for allowing your program administrator to register you for training or view your Alaska SEED level and status. Click “Next” located at the bottom right of the screen.
Updating Existing Employment Records
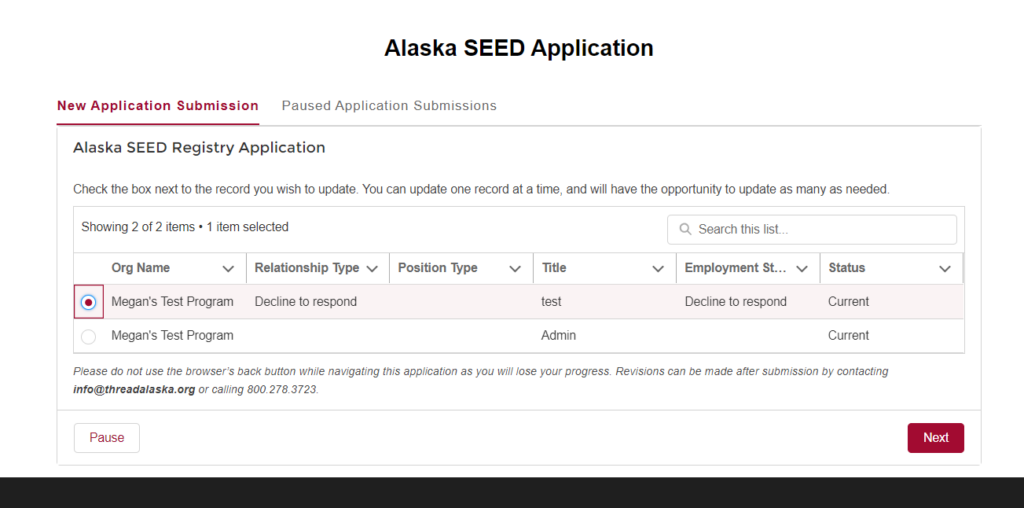
If any of the information on this screen is incorrect, select “Edit an Existing Record,” and then click “Next” located at the bottom right of the screen.
Select which place of employment has incorrect information and then click “Next” located at the bottom right of the screen.
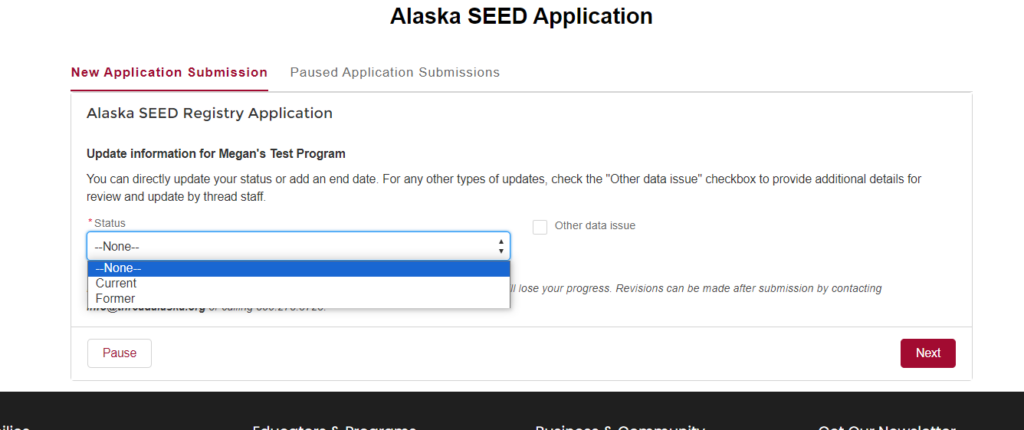
Select if the program or organization is your “Current” or “Former” place of employment (if Former, select what date your employment ended). If the data issue is something other than changing the Current or Former status, select “Other data issue,” type what the issue in the box that appears, and then click “Next” located at the bottom right of the screen.
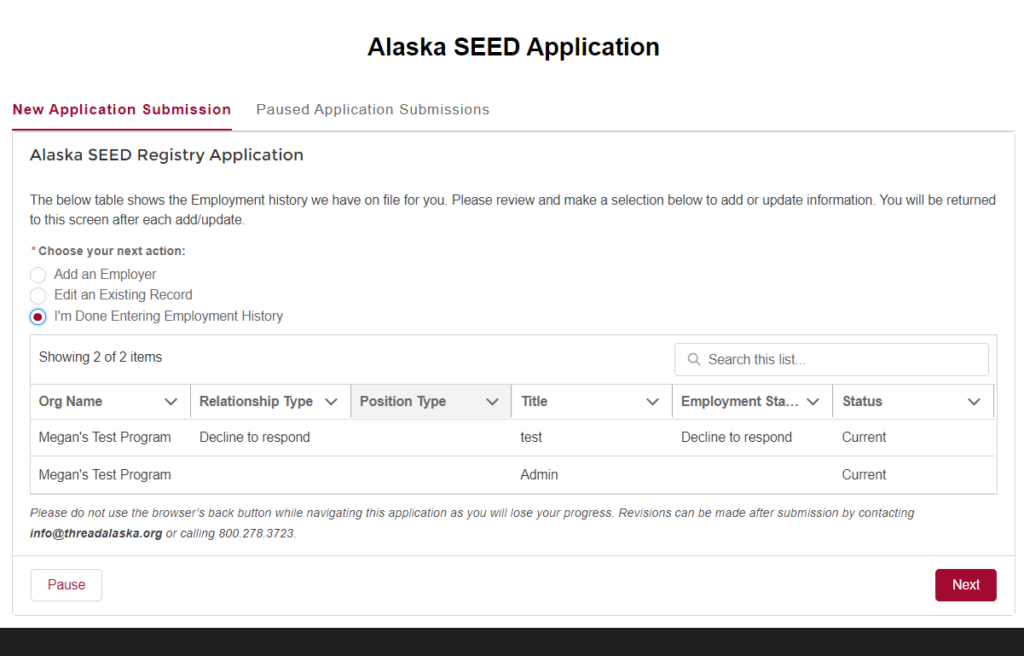
If you are done editing your early child care employment history, select “I’m Done Entering Employment History,” and then click “Next” located at the bottom right of the screen.
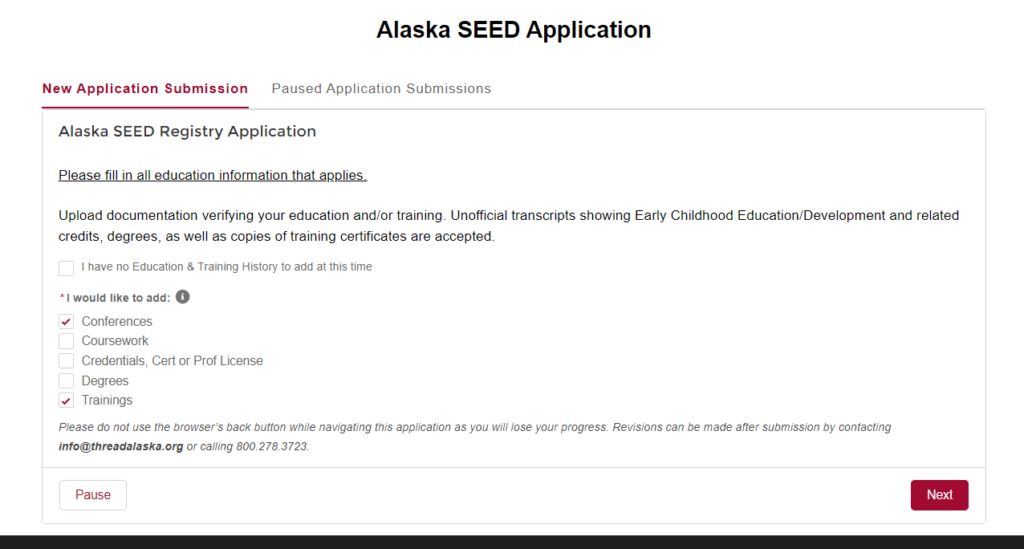
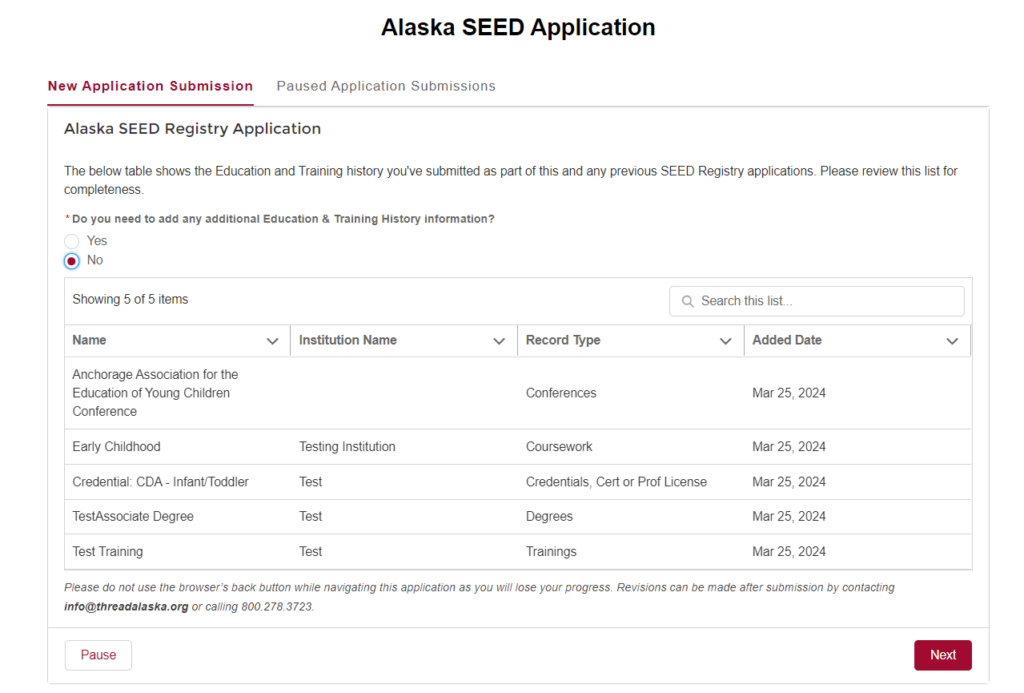
Education and Training History
This next screen allows you to view the education and training documentation you have previously uploaded. Click “Next” located at that bottom right of the screen to proceed to adding additional Education and Training History.

Select the checkbox next to the type of education and training history you would like to add/upload and then click “Next” located at the bottom right of the screen. If you have nothing to add, select “I have no Education & Training History to add at this time,” and then click “Next” located at the bottom right of the screen.
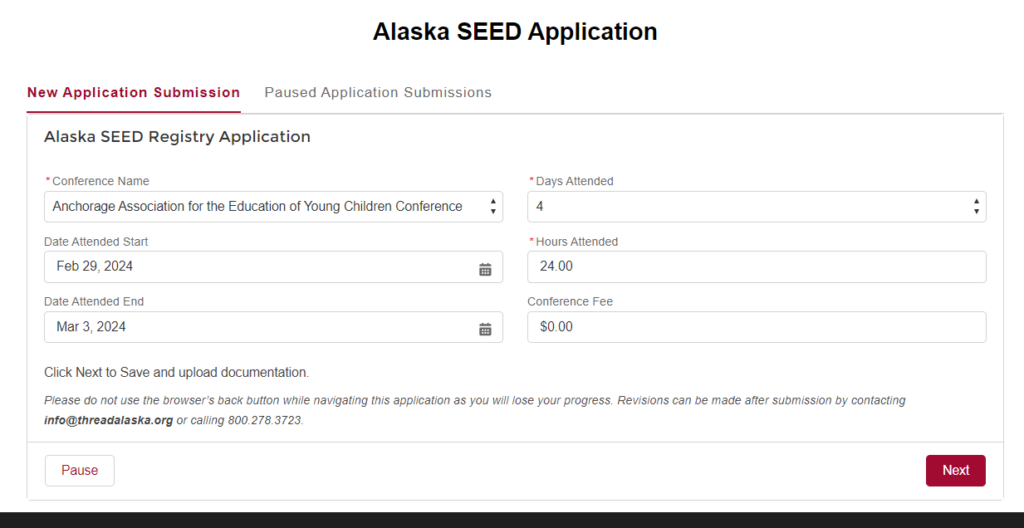
Conferences: adding information about conferences you have attended
To add a conference you attended, make sure to select the checkbox next to “Conferences,” and then click “Next” at the bottom right of the screen. You will select the name of the conference attended, the date the conference started as well as ended, the number of days you attended the conference, type in the number of hours you were in attendance at the conference, and then type in the amount of the conference fee, if applicable, then click “Next” located at the bottom right of the screen.

Upload any documentation pertaining to the conference, by clicking “Upload Files.” Select which file you would like to upload and then click “Open.” Click “Done” in the Upload Files box that appears, once the file has completed uploading.
If you would like to add another conference you attended, select “Yes” under “Add another Conference?,” and then click “Next” located at the bottom right of the screen.
If you are done adding conferences you have attended, select “No” under “Add another Conference?,” and then click “Next” located at the bottom right of the screen.
If you are done adding Education & Training History information, select “No” under “Do you need to add any additional Education & Training History information?” and then click “Next” located at the bottom right of the screen.
If you need to add additional Education and Training History information or documentation, select “Yes” under “Do you need to add any additional Education & Training History information?” and then click “Next” located at the bottom right of the screen.

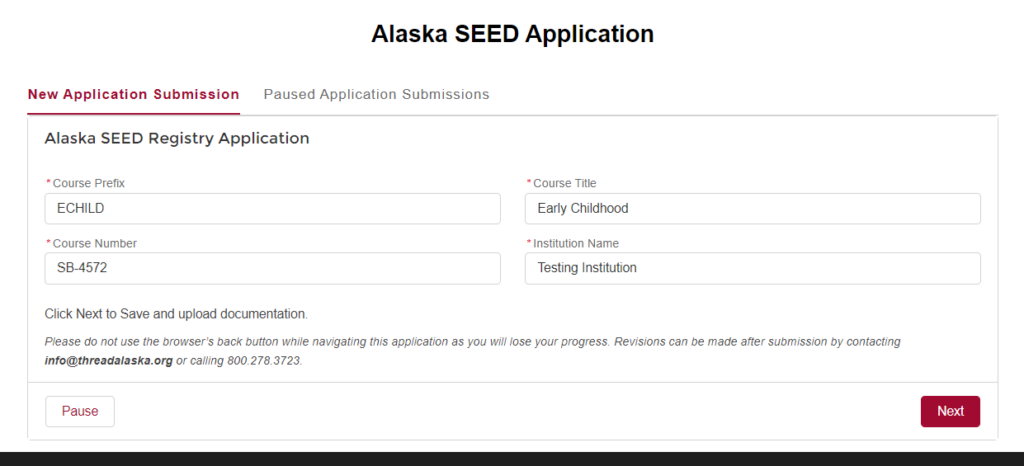
Coursework: adding information about coursework you have completed
To add information about recent coursework, make sure to select the checkbox next to “Coursework,” and then click “Next” at the bottom right of the screen.
You will enter in the Course Prefix, the Course Title, the Course Number, and the Institution Name you took this coursework from. Then click “Next” located at the bottom right of the screen.
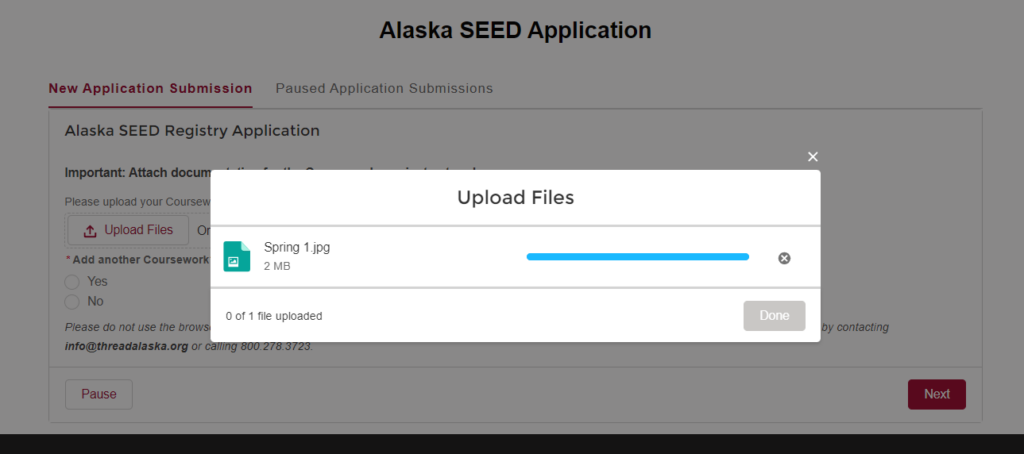
Upload any documentation pertaining to your coursework, by clicking “Upload Files.” Select which file you would like to upload and then click “Open.” Click “Done” in the Upload Files box that appears, once the file has completed uploading.
If you would like to add more coursework information, select “Yes” under “Add another Coursework?,” and then click “Next” located at the bottom right of the screen.
If you are done adding information about coursework you have completed, select “No” under “Add another Coursework?,” and then click “Next” located at the bottom right of the screen.
If you are done adding Education & Training History information, select “No” under “Do you need to add any additional Education & Training History information?” and then click “Next” located at the bottom right of the screen.
If you need to add additional Education and Training History information or documentation, select “Yes” under “Do you need to add any additional Education & Training History information?” and then click “Next” located at the bottom right of the screen.

Credentials, Certification or Professional License: adding information about credentials, certifications or professional licenses you have received
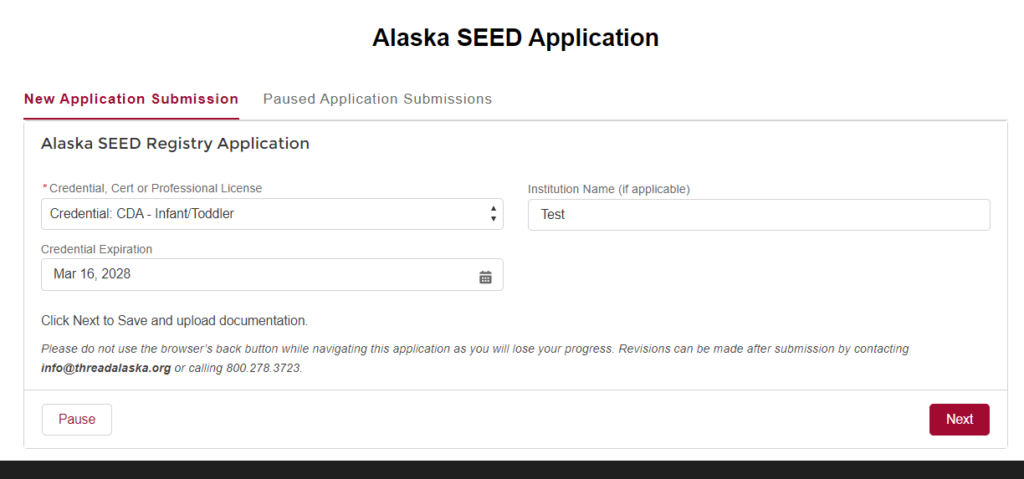
To add information about recent credentials, certifications or professionals licenses you have received, make sure to select the checkbox next to “Credentials, Cert or Prof License,” and then click “Next” at the bottom right of the screen.
Select the name of the Credential, Cert or Professional License from the drop down list. Type in the Institution Name (if applicable). Select the date the credential expires (if applicable). Then click “Next” located at the bottom right of the screen.
Upload any documentation pertaining to your Credential, Cert or Professional License, by clicking “Upload Files.” Select which file you would like to upload and then click “Open.” Click “Done” in the Upload Files box that appears, once the file has completed uploading.
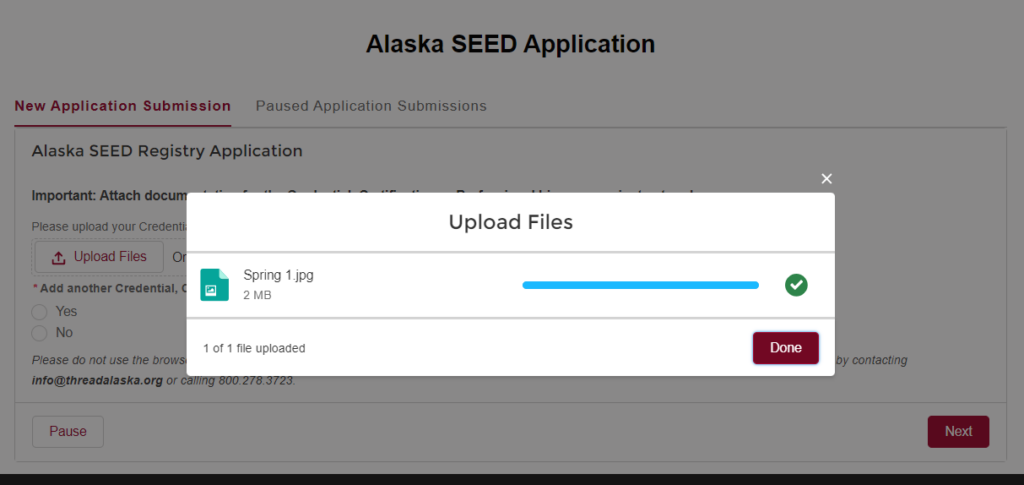
If you would like to add more Credential, Cert or Professional License information, select “Yes” under “Add another Credential, Certification or Professional License?,” and then click “Next” located at the bottom right of the screen.
If you are done adding information about Credentials, Certs or Professional Licenses you have received, select “No” under “Add another Credential, Cert or Professional License?,” and then click “Next” located at the bottom right of the screen.
If you are done adding Education & Training History information, select “No” under “Do you need to add any additional Education & Training History information?” and then click “Next” located at the bottom right of the screen.
If you need to add additional Education and Training History information or documentation, select “Yes” under “Do you need to add any additional Education & Training History information?” and then click “Next” located at the bottom right of the screen.

Degrees: adding information about degrees you have received
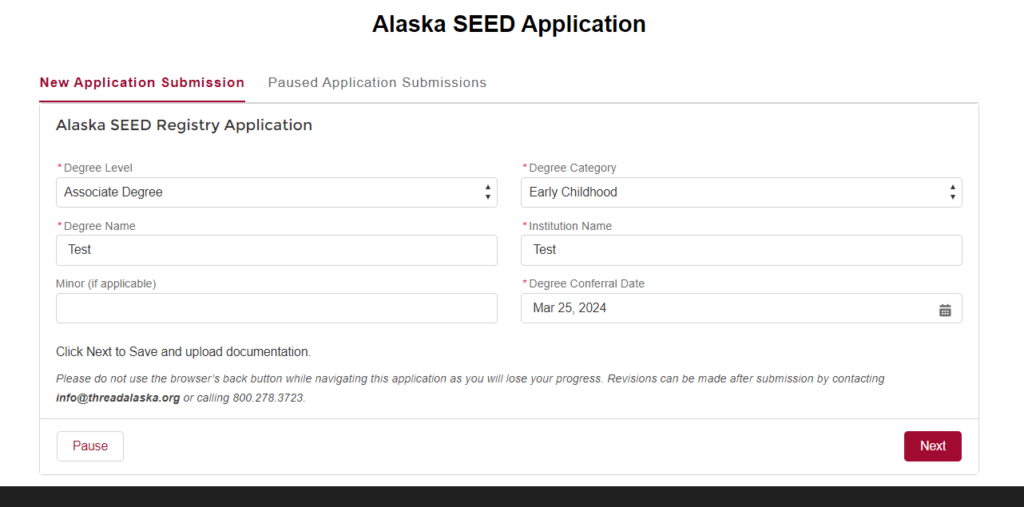
To add information about recent degrees you have received, make sure to select the checkbox next to “Degrees,” and then click “Next” at the bottom right of the screen.
Select the name of the Degree Level achieved from the drop down list provided. Type in the name of the degree in the box labeled “Degree Name.” If applicable, type in the name of the Minor in the box labeled “Minor (if applicable).” Select the Degree Category from the drop down list provided (Early Childhood, School-Age, Related field, Unrelated field). Type the name of the institution you received the degree from in the box labeled “Institution Name.” Select the date you received the degree in the box labeled “Degree Conferral Date.” Then click “Next” located at the bottom right of the screen.
Upload any documentation pertaining to your degree, by clicking “Upload Files.” Select which file you would like to upload and then click “Open.” Click “Done” in the Upload Files box that appears, once the file has completed uploading.
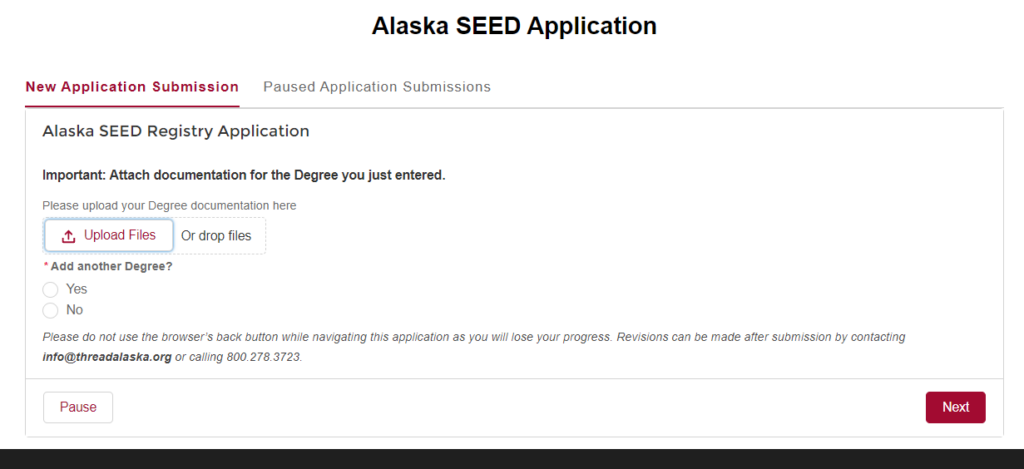
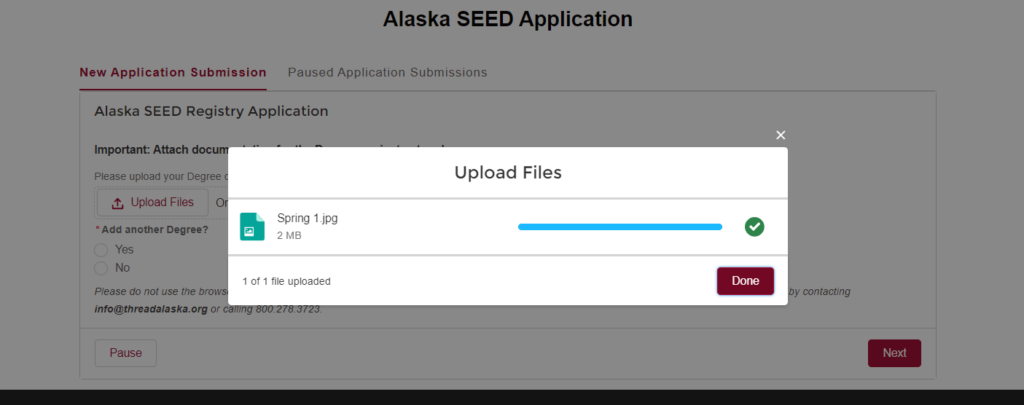
If you would like to add more degrees you have received, select “Yes” under “Add another Degree?,” and then click “Next” located at the bottom right of the screen.
If you are done adding information about degrees you have received, select No under “Add another Degree?,” and then click “Next” located at the bottom right of the screen.
If you are done adding Education & Training History information, select “No” under “Do you need to add any additional Education & Training History information?” and then click “Next” located at the bottom right of the screen.
If you need to add additional Education and Training History information or documentation, select “Yes” under “Do you need to add any additional Education & Training History information?” and then click “Next” located at the bottom right of the screen.

Trainings: adding information about trainings you have attended
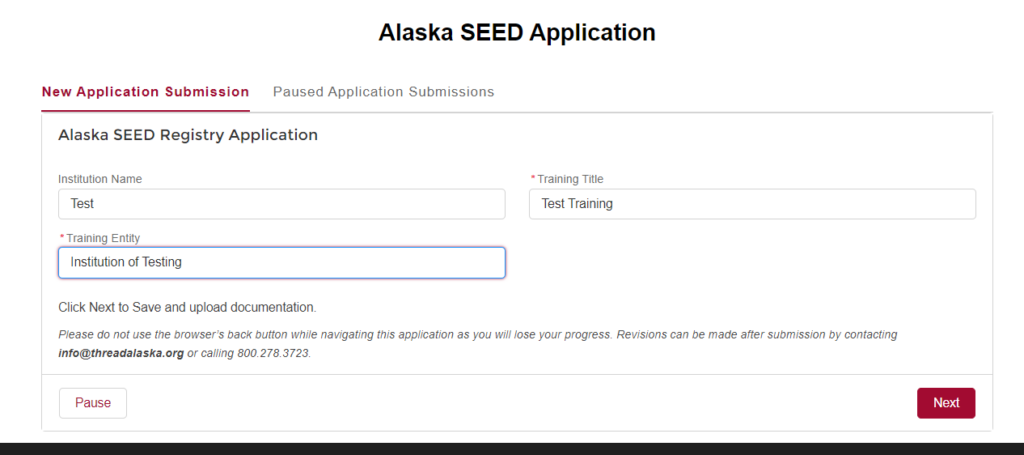
To add information about recent trainings you have attended, make sure to select the checkbox next to “Trainings,” and then click “Next” at the bottom right of the screen.
Type in the name of the institution you received this training from in the box labeled “Training Entity.” Type the name of the training in the box labeled “Training Title.” Then click “Next” located at the bottom right of the screen.
Upload any documentation pertaining to your training, by clicking “Upload Files.” Select which file you would like to upload and then click “Open.” Click “Done” in the Upload Files box that appears, once the file has completed uploading.
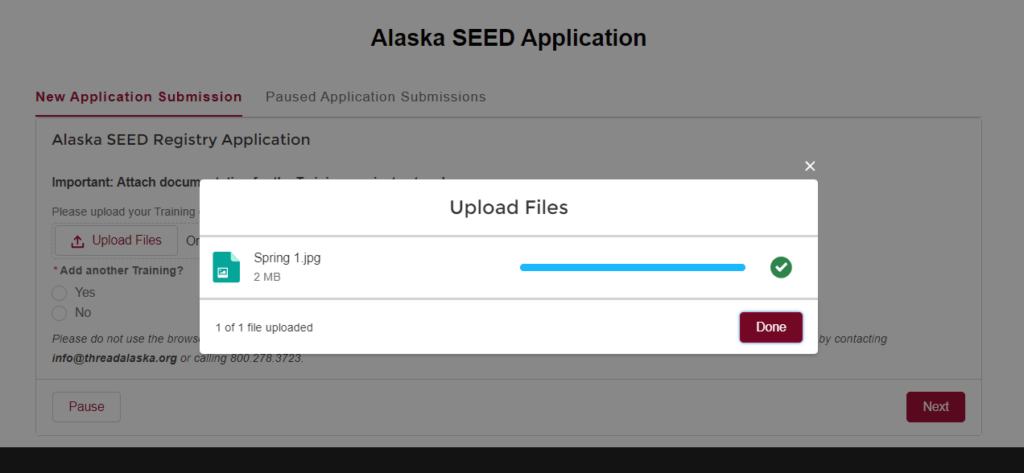
If you would like to add more trainings you have attended, select “Yes” under “Add another Training?,” and then click “Next” located at the bottom right of the screen.
If you are done adding information about trainings you have attended, select “No” under “Add another Training?,” and then click “Next” located at the bottom right of the screen.
If you are done adding Education & Training History information, select “No” under “Do you need to add any additional Education & Training History information?” and then click “Next” located at the bottom right of the screen.
If you need to add additional Education and Training History information or documentation, select “Yes” under “Do you need to add any additional Education & Training History information?” and then click “Next” located at the bottom right of the screen.
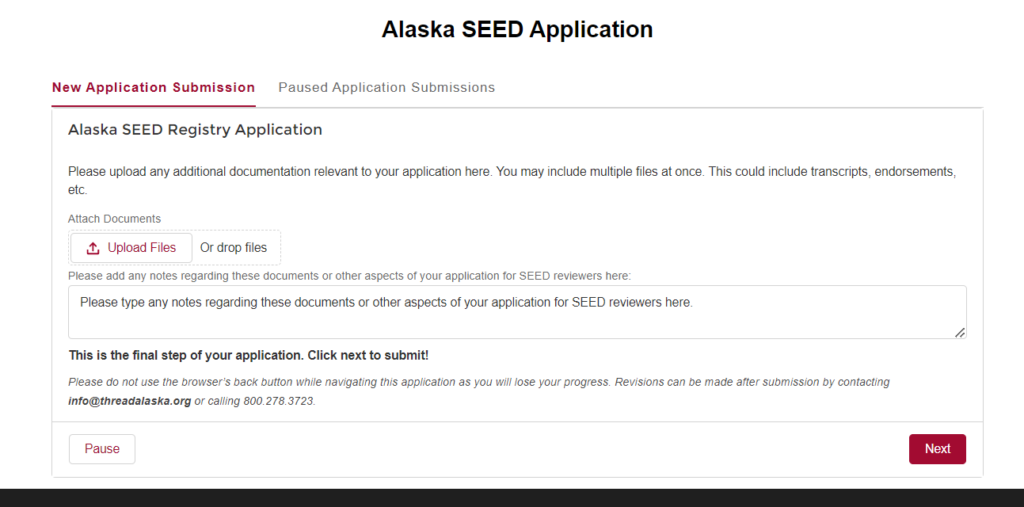
Final Submission
You can type in any additional notes in the box on this next screen. You can also upload any additional files or documents by clicking “Upload Files.” Select which file you would like to upload and then click “Open.” Click “Done” in the Upload Files box that appears, once the file has completed uploading. Click “Next,” located at the bottom right of the screen, when you are done adding any additional files or notes.
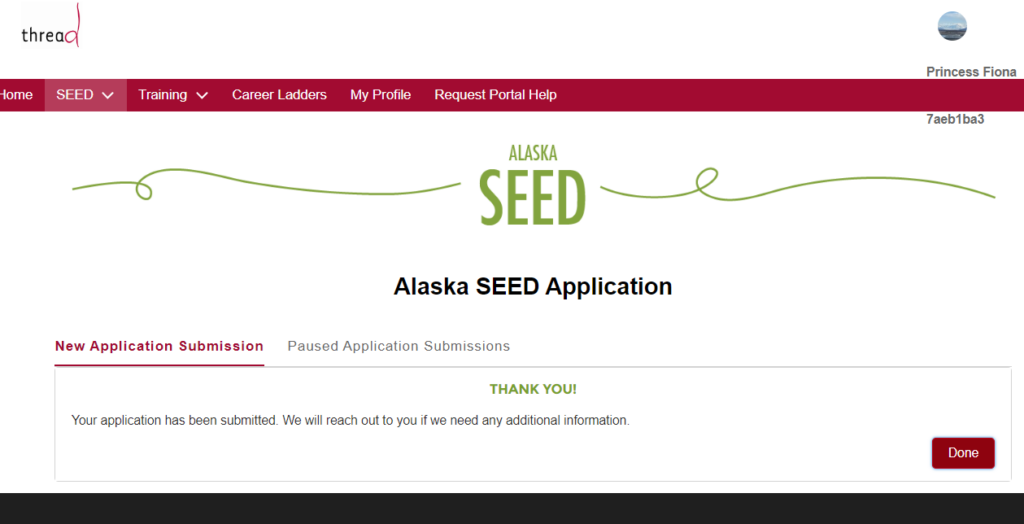
The next screen will read “THANK YOU! Your application has been submitted. We will reach out to you if we need any additional information.” You can click “Done” to be returned back to the Home screen.